Installation Instructions for:
Belkin USB Motherboard Cable Assembly
Belkin Part #F3U001
Revised 6/1/98
WARNING!
PLEASE CAREFULLY READ AND FOLLOW THIS INSTRUCTION SHEET BEFORE
INSTALLATION. FAILURE TO DO SO MAY RESULT IN IMPROPER INSTALLATION,
WHICH COULD DAMAGE YOUR PC, MOTHERBOARD, AND/OR ATTACHED PERIPHERALS.
Thank you for purchasing this Belkin PRO Series cable assembly. This cable was designed to work with the great majority of motherboards used throughout the industry. For installation of this cable you will need to reference the owners manual that was included with your motherboard.
|
|
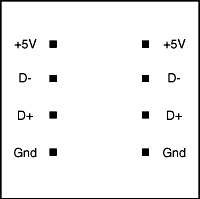
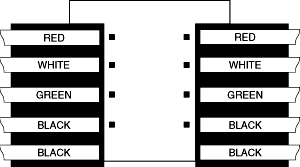
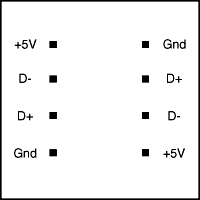
Step 1 Check your motherboard's documentation and identify which of the four examples provided matches the pinout of your motherboard's USB connector. Step 2 Please turn off your PC and disconnect the external power cable before starting installation. Open the case of your PC. Step 3 Insert the 5 pin connector to the motherboard as shown per the diagram for each example. Please take great care in matching the color code of the USB Motherboard cable as shown in each example. Note that each USB A connector has an identical 5-pin connector attached for ease of installation. Step 4 Install the mounting bracket onto the expansion slot of the PC and secure it with the original Phillips head screw that was included with your PC. Close the case, and reconnect the external power cable. Step 5 You are now ready to enjoy the benefits of having USB! |
Example A
Example A (top)
|
|
(NOTE COLOR CODE) |
 |
 |
Example B (top)
|
|
(NOTE COLOR CODE) |
 |
 |
Example C (top)
|
|
(NOTE COLOR CODE) |
 |
 |
Example D (top)
|
|
(NOTE COLOR CODE) |
 |
 |
